You probably have already picked out the perfect machine for your business. Before you pull the trigger, though, it’s important to make sure that everything you need for the machine is in place in your cafe.
Different machines have different requirements, so even if you’re installing a new machine into an existing cafe, don’t assume that the setup will be correct for the new machine. Check all the specifications carefully — everything from the size, the power needed, the water requirements, even the ideal placement of the holes in the countertop may be different.
Whether you’re building your cafe from scratch, or installing a new machine into an existing cafe, this guide will help you get prepared for a smooth installation.
⚠ This guide gives general advice on preparing for machine installation. Installation must always be carried out by a qualified technician only. Follow the guidance given to you by your espresso machine technician and carefully read the requirements given in the manufacturer’s instructions before installation begins.
Check the dimensions
The first thing to check before you buy an espresso machine is that there is enough space on the bar to fit the machine and all the accessories. This may seem obvious — but it’s incredible how often an unforeseen obstruction causes problems with installation.
Many espresso machines are similar in size. A cafe designer may assume that the espresso machine has standard dimensions when they draw up the layout of the espresso bar. However, many machines — especially more advanced models — will not fit into a standard layout.
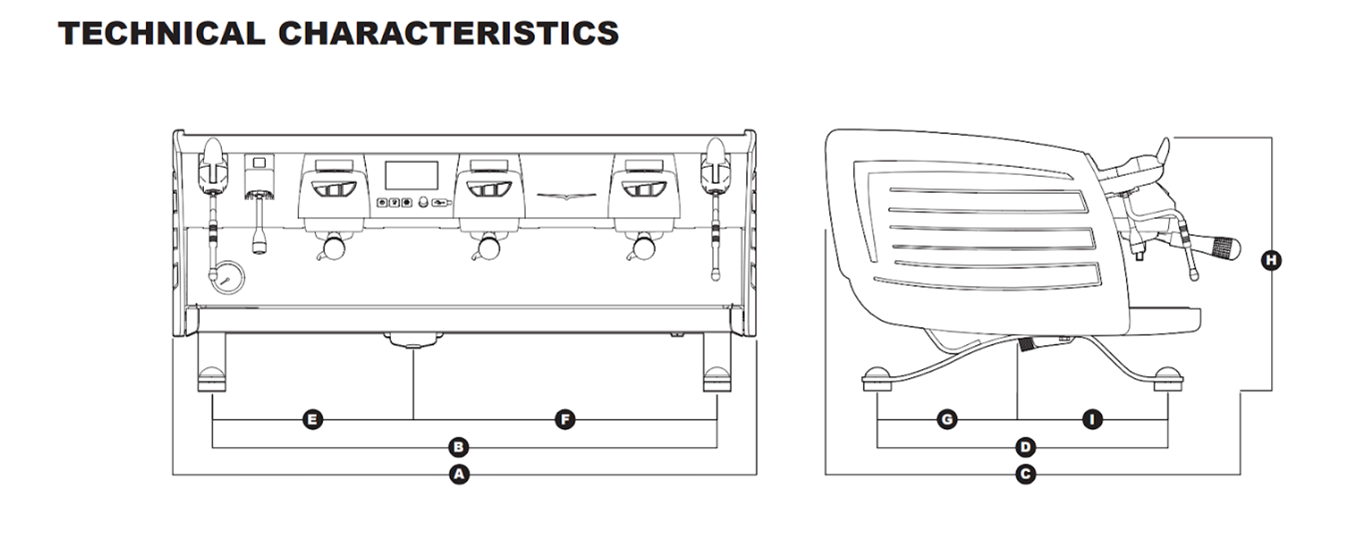
For example, the standard worktop depth is 600mm — but the Victoria Arduino Black Eagle is 690mm deep. If you haven’t built your countertop with the machine in mind, then this can cause a serious headache. Even if the counter is the right size, any obstruction such as a power socket mounted on a nearby wall can be enough to prevent the machine from being installed in its intended location.
Double check all the measurements for the machine, and make sure that the counter is not just wide enough, but deep enough — and that there is enough height available to fit the machine and any cups stacked on top of it.
When planning your layout, make sure to leave enough extra space around the machine for the grinders, water boiler, and any other equipment, as well as some working space next to the machine for the baristas.
Allowing sufficient working space around — and under — the machine can help your baristas work more efficiently.
Prepare the foundations
The countertop the machine sits on must be perfectly level, and strong enough to support the weight of the machine. Advanced espresso machines may be considerably heavier than traditional machines.
Modern espresso machines have multiple boilers and stainless steel parts, both of which can add a lot to the weight of the machine.
Multiple boilers weigh a lot more than a single boiler of the same volume. More metal is used to make the boilers themselves, and each boiler also needs its own heating element and pipework.
Steel is used in many modern espresso machines for parts that were traditionally made from brass or copper, because it is easier to clean, stronger, and less prone to limescale and corrosion. However, steel is less effective at holding and conducting heat than brass or copper. To compensate, steel parts such as group heads are often much thicker and heavier, because the thicker material can hold more heat.
These two factors mean that modern espresso machines can be very heavy. For example, a three-group Black Eagle weighs around 130kg once it’s filled with water. Make sure that the countertop is strong and sturdy enough to support that weight.
It’s also important to make sure that the countertop is perfectly level — both from side to side, and from front to back. Most machines have adjustable feet, to fine-tune the position of the machine — but many do not.
If the machine is not perfectly level after installation, then the water will not hit the bed of coffee evenly when you make an espresso. If the water hits the coffee unevenly, it will extract unevenly, making the espresso much less sweet and flavorful.
After installation, double-check that the machine is level. The best place to check this is on the underside of the group head: take out the portafilter, and push a spirit level up against the bottom of the group. Adjust the feet as necessary until the machine is perfectly horizontal.
Get the drainage right
Perhaps the most common problem with espresso machine installations is with the drainage. While this is not the most glamorous subject, a little planning before the machine arrives can save on some messy problems down the line.
If the drainage is not set up correctly, everything may seem fine at first. However, over the first weeks or months of use, coffee grounds will gradually build up in the pipes, until they create a blockage, which can be unpleasant and sometimes expensive to deal with.
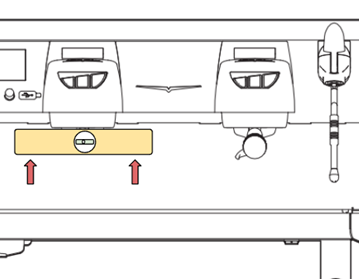
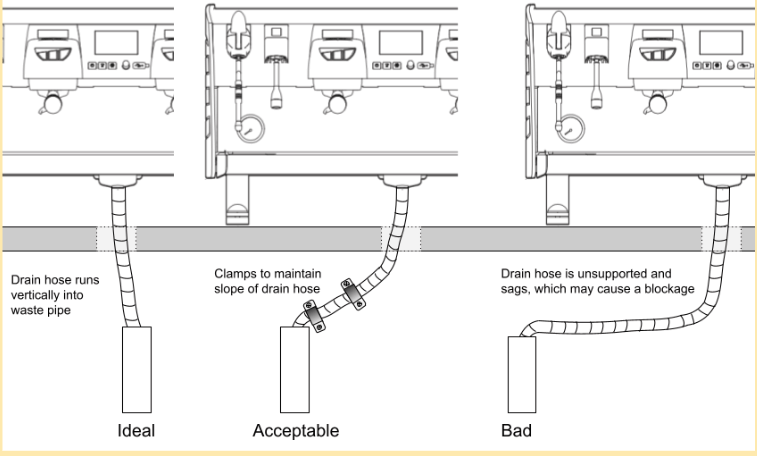
The waste from espresso machines drains out through a narrow flexible hose, which passes through a hole in the countertop into the waste pipe below. The hole in the countertop should normally be 50mm in diameter, so that there is room for all the power and plumbing for the machine to pass through. The waste pipe should consist of a short section of 250mm pipe pointing vertically upwards (called an up-stand) connected to a trap or U-bend.
The waste hose needs to run on a steady downward slope of at least 1 in 50 along its whole length, but ideally much steeper. If the hose has to travel any distance horizontally, then it should be supported to make sure that the slope is maintained throughout. For the same reason, it’s usually best if the hole in the countertop is directly underneath where the waste hose leaves the machine.
If possible, it’s best to drill the hole when the machine is already on site to achieve the perfect location.
If the hole has to be drilled ahead of time, then check diagrams of the machine or the manufacturer’s installation guidelines to get the exact placement. If in doubt, consult with your installation technician before drilling the hole.
Water and power
Getting the water and power connections right is relatively simple, but there are a few important points to bear in mind.
The water connection should terminate in an isolation valve, so that the water to the machine can be easily shut off in an emergency. Usually, a ¾” valve is used, similar to that used for washing machines. If you have a different fitting, let your engineer know ahead of time so they can bring the correct adaptors.
The water supply is connected to the water filter, which in turn is connected to the machine, The water connection must supply cold, potable water — the water filter removes some contaminants but does not sterilize the water.
The water connection must supply cold, potable water — the water filter removes some contaminants but does not sterilize the water.
The water pressure reaching the machine needs to be between 2 and 4 bars (30–60 psi). If the pressure is higher than 4 bars, then a pressure regulating valve should be fitted to bring the pressure down. If the pressure is lower than 2 bars, then a booster pump and tank should be installed to maintain a steady supply of water. Check the water pressure well before installation day and discuss with your technician if any adjustments are needed.
Different machines have different power requirements, but nearly all need a dedicated power supply. The power supply should be connected with an omnipolar isolation switch, placed somewhere accessible within 1 meter of the machine, so that it can be quickly shut off in case of emergency. Check the specifications and discuss the installation with your electrician to ensure your power connection complies with the relevant legislation.
Some machines use single-phase power, while some require a 3-phase connection. 3-phase power is a special kind of electrical connection using three wires instead of one, which is used for high-power appliances.
Not all buildings will have access to 3-phase power, so before you buy a machine, check with your electrician that you will be able to install a 3-phase connection.
Some machines can be converted between single or 3-phase power — your technician may be able to do this for you during installation, or the machine may need to be converted in the factory when you order it.
The day the espresso machine arrives is always exciting — but some careful planning before installation can help the process go much more smoothly. A good installation can help the machine run efficiently and make your baristas’ lives much easier, saving plenty of time in the long run.
Still searching for The One?
Looking for advice on what machine can fit into your cafe — or how to build your cafe to fit your dream machine? Contact us for a free consultation to ensure a smooth install.
REQUEST FREE CONSULTATION